Now it's time to setup my first real AI based function. I decided to start real simple with a story generation function. The story would be in the Left-Right Game Story that could be used to play gift giving games at family get togethers.
Step 1: Create OpenAI Account and setup API Keys
Pretty simple and no need to write much about this beyond the reminder to keep your API keys safe. Don't directly use them in your code of any kind, but definitely not in client-side code that gets downloaded to a browser. Always retrieve your keys from environment configuration or similar; ideally where the secret can be stored encrypted/hashed.
Step 2: Coding against OpenAI API via a Gatsby Serverless Function
I started by writing a Gatsby Serverless function in TypeScript. The code used the recommend OpenAI Node.js library. The links to the reference api call documentation is basically what my code did as well. Very straightforward.
Step 3: The Art of Prompting - Crafting the Right AI Input
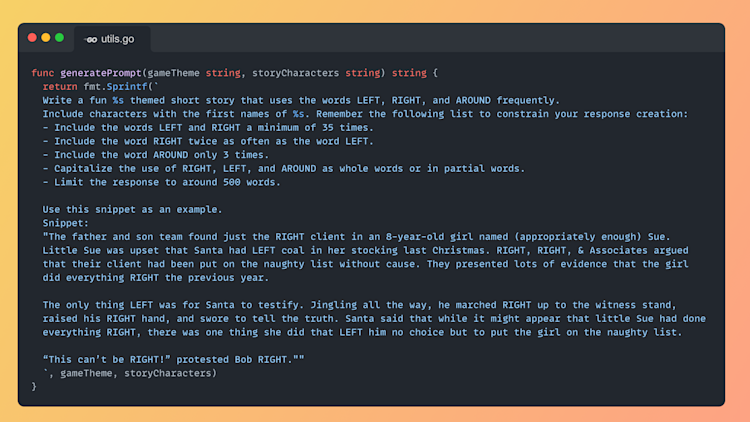
Now, for the artistry! Crafting the perfect prompt felt a little like Ron Weasley casting a spell. I was never sure what I would get. I designed a prompt structure that included an example story and specific instructions for the AI: the story theme and a list of characters.
Here is what the prompt structure looks like: (This is GO code. More on why later)

Step 4: Testing the Waters - Deploying to Netlify
Everything worked fine locally. The next step was deploy to Netlify to test in production. I quickly encountered a 10-second execution limit imposed on Netlify free-tier serverless functions. I wasn't willing to pay to increase this limit so I needed to change course.
To test our setup in a real-world scenario, we deployed it to Netlify, our chosen hosting platform. This step allowed us to see how our serverless functions handled the workload.
Step 5: A Change of Scenery - Transitioning to GCP
To overcome this hurdle, I decided to change the serverless function hosting environment Google Cloud Platform (GCP). Just to make it fun I also ported my code to GO to see how that would go to ask ChatGPT to port go between langauges. More on this in a later post. For this post, after I had that setup it eliminated the short timeout issue and I was happy. Except for it was taking about 20+ seconds to return to the client so the client just sits waiting with little spinner I implemented from theme-ui. I wanted to try to find a way to make this experience better similar to how you see ChatGPT gradually load the response into the browser.
Step 6: Embracing Streaming - Handling Data in Chunks
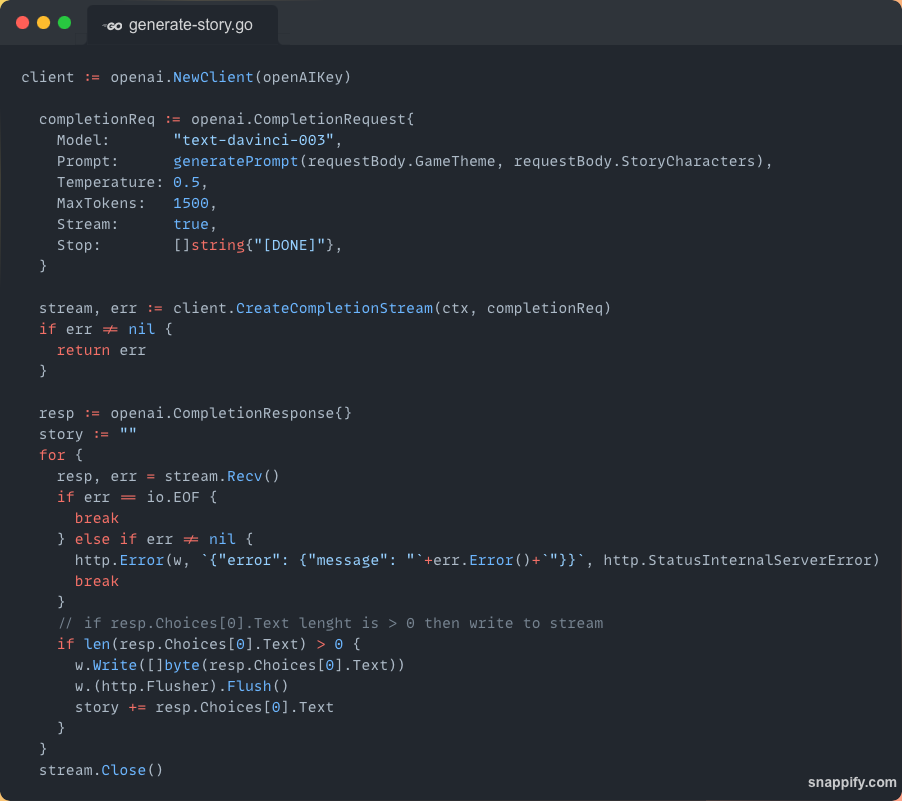
I discovered a streaming option in the API, allowing us to receive responses in text chunks. This breakthrough enabled us to create that ChatGPT-like experience that I was looking for. This was probably the biggest challenge I faced for something I didn't quite know how to do. I needed to figure out how the OpenAI library call needed to be made to ask for streamed data, how to have my serverless function return data as a stream, and have my front-end client code know how to receive and render the data as it came in.
Here is the GO code that accomplished calling OpenAI to return streamed data.

Getting my serverless function to return a stream was pretty easy by setting the Header Content-Type to text/event-stream and then the above code on the w.Write and w.Flusyh calls to send it back to the client.
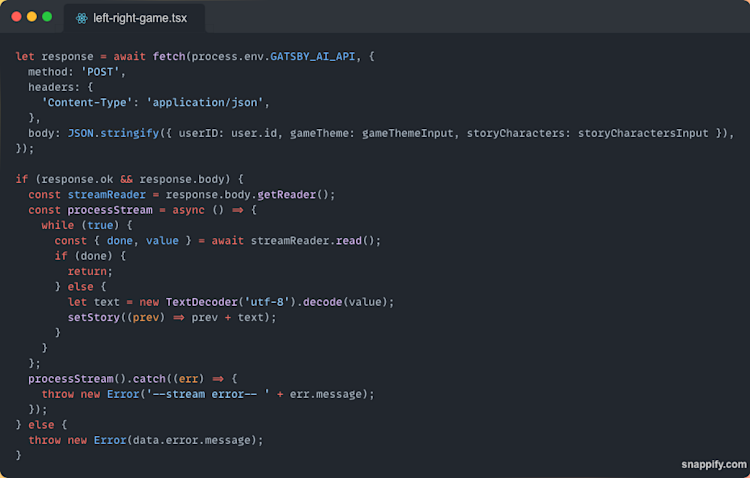
The client side ended up being pretty easy to switch to streaming. This is what that code looks like now. The response object is the return from my serverless function call and the setStory sets a state variable that React knows about via useState to update the rendered component in the DOM.

Conclusion
In this step, I hit a lot of new learning across OpenAI's API, setting up serverless APIs, and conquering the complexities of data streaming over HTTP. This was a fun one to work on.